Sunday, June 30, 2013

Love Birds

I asked my husband what type of card I should make today. He suggested that I make an anniversary card. When I came into the craft room to do so, I had no idea what I wanted to do to make this card. I looked on Miss Kate Cuttables at www.misskatecuttables.com to see what the freebie of the day was. Who would have thought that it was a pair of love birds? No me, that's for sure. So I decided to use that cutting file today to make an anniversary card.


Since the love birds are sitting on a branch I wanted to use blue as the background since the sky is blue. I used my Cuttlebug to emboss hearts on the background piece of paper. I used my Silhouette Cameo to cut the SVG file for the love birds on the branch.

On the inside I simply wrote Happy Anniversary To A Pair of Love Birds!


Saturday, June 29, 2013

Herringbone Technique


This is the start of the design. 
I used a 4 x 6 base.

This is how it looks after all the pieces are adhered and the ends cut off.

I chose to mount it on a grey background, using black cardstock for the base card. 
I added a dark pink ribbon at the bottom for decoration.

For the sentiment I cut a hexagon out with my 
Creative Memories cutting system.

Friday, June 28, 2013

Purple Monochromatic

I chose to use another sketch that I saw online to make today's card. It is a purple monochromatic card, which simply means that it is different shades of purple incorporated together. 
For the background I cut out 8 circles. There is no need for a center circle because it gets covered up. 

Here is the finished card, which includes an embellishment cut out with my Silhouette Cameo and a stamped sentiment.

Thinking of you cards are always handy to have. You never know when you might want to just drop somebody a note in the mail just to say hi. 

Thursday, June 27, 2013

Chevron Hello

Pinterest is pretty hard to get away from once you have started looking on the site. There are so many good ideas out there, not just for crafting, but for just about anything. That is where I got my idea for this card.

These are the strips I used to make my pattern with. Double sided paper is the best so that you have a pattern showing on both sides. 

This is what the paper looks like during the folding process. As you can see the pattern on the back shows once the paper is folded.

With a total of 5 strips of paper folded you get the chevron pattern.

I decided to add ribbon and the stamped sentiment hello. 

This is a very versatile card. It could be used for anything. 


Wednesday, June 26, 2013

Masculine Birthday

I chose to do a card based on a card sketch I found on Pinterest. Trying to figure out measurements is sometimes hard, but it all depends on the size of your base card. This is an 8.5" x 5.5" card. I just used a ruler and a cutter for all the straight cuts. The circle is cut using my Creative Memories cutting system.
The blue is actually a navy blue, but again with lighting issues still not worked out it didn't show up that way. As I said before the base card is 8.5" x 5.5". The purple rectangle is 4.25" x 5.5". The red, blue, and off white squares are 3" x 3". The green background square is 3.25" x 3.25". The red strip is 0.5" x 5.5". The circle is a 2.5" circle.

I chose a birthday saying stamp to go on the inside with room to write a personal message.

Coming up with cards for males tends to be a little bit harder due to use of colors. I tend to lean more towards darker colors when making cards for my husband.

Tuesday, June 25, 2013

Springy Thanks

I chose to follow a similar idea I have seen for this card. One card you can never have too many of is a thank you. Again the lighting isn't the greatest, plus I am still learning to use my new camera.
I cut the flowers and cloud border with my Silhouette Cameo. I chose pastel colors for something different. I don't use pastel a whole lot. I used stamps for the stems and letters.

I used the Silhouette Cameo to cut out the flower just for a little embellishment on the inside.

Monday, June 24, 2013

Helpful Husband

My husband helped me with today's card, so I wanted to make sure to mention that. He is so supportive of what I do and I thank God everyday for blessing me with such a great husband.
I wanted to use my Cuttlebug, but it was upsetting me because it kept cracking my paper. My husband offered to give it a try and it worked just fine for him. He also suggested to add a ribbon to the card and we agreed on the placement of the ribbon. 

I like doing more complex cards, but again I have to remind myself that it is okay to be simple.

Sunday, June 23, 2013

It's a....baby!

I have 3 best friends that come from different parts of my life. They are all very important to me in different ways and for different reasons. Lisa is my childhood best friend. Even though we didn't keep in touch for a while because we were in different chapters in our lives we have reconnected and so thankful for that. Cathryn is my best friend/roommate from college. Without her I don't know how long I would have stayed in college because I missed home, but she made me happy while away from home. Renee is my best friend from one of the jobs I had. There were days I dreaded going to work, but knowing that she was working on certain days was helpful because I knew I could rely on her as her boss. Even though they all come from different chapters of my life they are all still my best friends. I can go to them for anything. I can rely on them at anytime.

Tonight's card is a baby card, but this weekend one of my best friends was visiting and we learned a new technique together, which is used on the card.

This was done with the We R Memory Keepers Sew Easy. When looking at the color combinations I wasn't completely sure what I wanted to do.

As I looked at my stamps this saying was perfect and I turned it into a nice gender neutral baby card.

Stamped inside.

Sometimes life gets busy and we tend to forget the most important things in our lives. This weekend was a reminder of how having a distance between friends tends to make keeping in touch or getting together more difficult, but it can be done. It's not always out with the old and in with the new. 

Saturday, June 22, 2013

Valentine's

I used one of my border punches to create the embellishments on this card. I then layered them up and adhered them together. Once together, I cut them down to the size I needed for my card. I chose to make it a Valentine's Day card by adding the sentiment with gold ink and a stamp. 

Friday, June 21, 2013

Thinking of You

Summer is upon us and our schedule has gotten busier. I didn't want to quit on my goal of doing one card a day, so sometimes I will do some rather quick and simple cards. I have to remind myself that, that's okay and accept that some days I won't have a lot of time to put into this project.

I just found out a friend of mine is having some trouble with her pregnancy. That is why I chose to do a thinking of you card to remind her that she is not alone. 

I know the lighting isn't the greatest and it is something I am continuously working on so that the cards are easier to see.

I used my Cuttlebug to emboss the background colors of my card. I used a corner rounder to take of the square edges of the card, as well as the sentiment piece. I had a ribbon with a bow for some added embellishing. The thinking of you is stamped on.

Even though this was a quick and simple card it still turned out nice. Not everything has to be complex. Simple is okay too.


Thursday, June 20, 2013

Quilted Birthday

I got the idea for this card by looking on Pinterest again. I chose to use primary colors as they always go well together and make choosing where to place them quite easy. So here is my version on a "quilt" card.

I cut the different colors into 1.5" squares. I chose to emboss some of them for a little added fun. I placed all my pieces on my background carefully leaving just a little bit of the background color to show through. This helped with alignment. Once I had all my pieces in place I folded the blue paper and cut off the extra. It came out to be a 4 3/4" by 4 3/4" card. 

To make the sentiment pop a little bit more I chose to use 2 different colors than I had used for the blocks. I also left some space after birthday so it could be personalized to whoever will be receiving it. I also used 3D foam squares to lift the sentiment up some off of the card. 

For the inside of the card I added a strip of the colors I used and chose to emboss that.

This was a very simple card to put together and it went together pretty quickly. 

Wednesday, June 19, 2013

The ants go marching one by one. Hurrah! Hurrah!

I started out my card for today by picking out the watermelon border. As I was looking through my different cuts this one screamed summer to me and I think we might finally be getting warmer weather that will stay around. After I had it cut out with using my Silhouette Cameo I didn't know what to do next. This card is one that came together miraculously. 
This is the border that started my whole card. I decided to put it on a red plaid background to symbolize a picnic blanket. I cut the border out with my Silhouette.

I decided on a green card and wanted the border on the bottom. Then my mind jumped to clouds, so I found a cloud border to cut out. I used my Cuttlebug to emboss the clouds for a little extra. I designed the ant on the Silhouette Studio. I could have bought one, but I decided to design it. For the antennas I chose to use pipe cleaners. The thought bubble I purchased and cut out with my Silhouette too.

For the inside I cut out the watermelon banner and cut of one piece of watermelon.

This was a fun card to make. At first I had no idea what I was going to do with my watermelon border, but I was determined to use it on today's card. When my husband looked at the card before I had the ant on it he told me it looked like a thinking of you card. That is when the ant popped into my head and I went from there.

Tuesday, June 18, 2013

Christmas in June?

Tonight's card simply started out as a technique that I wanted to try. I don't have a whole lot of different punches to work with, so I resorted to my star punches again. I could have chosen any cut on my Silhouette if I wanted to. Anyway, I saw this technique on Pinterest and I really wanted to try it so here is tonight's card.

First I cut down a piece of paper to the size of 4 1/4" by 5 1/2" since that is the same size as the base card I decided to use. I also punched out my stars in the same color.

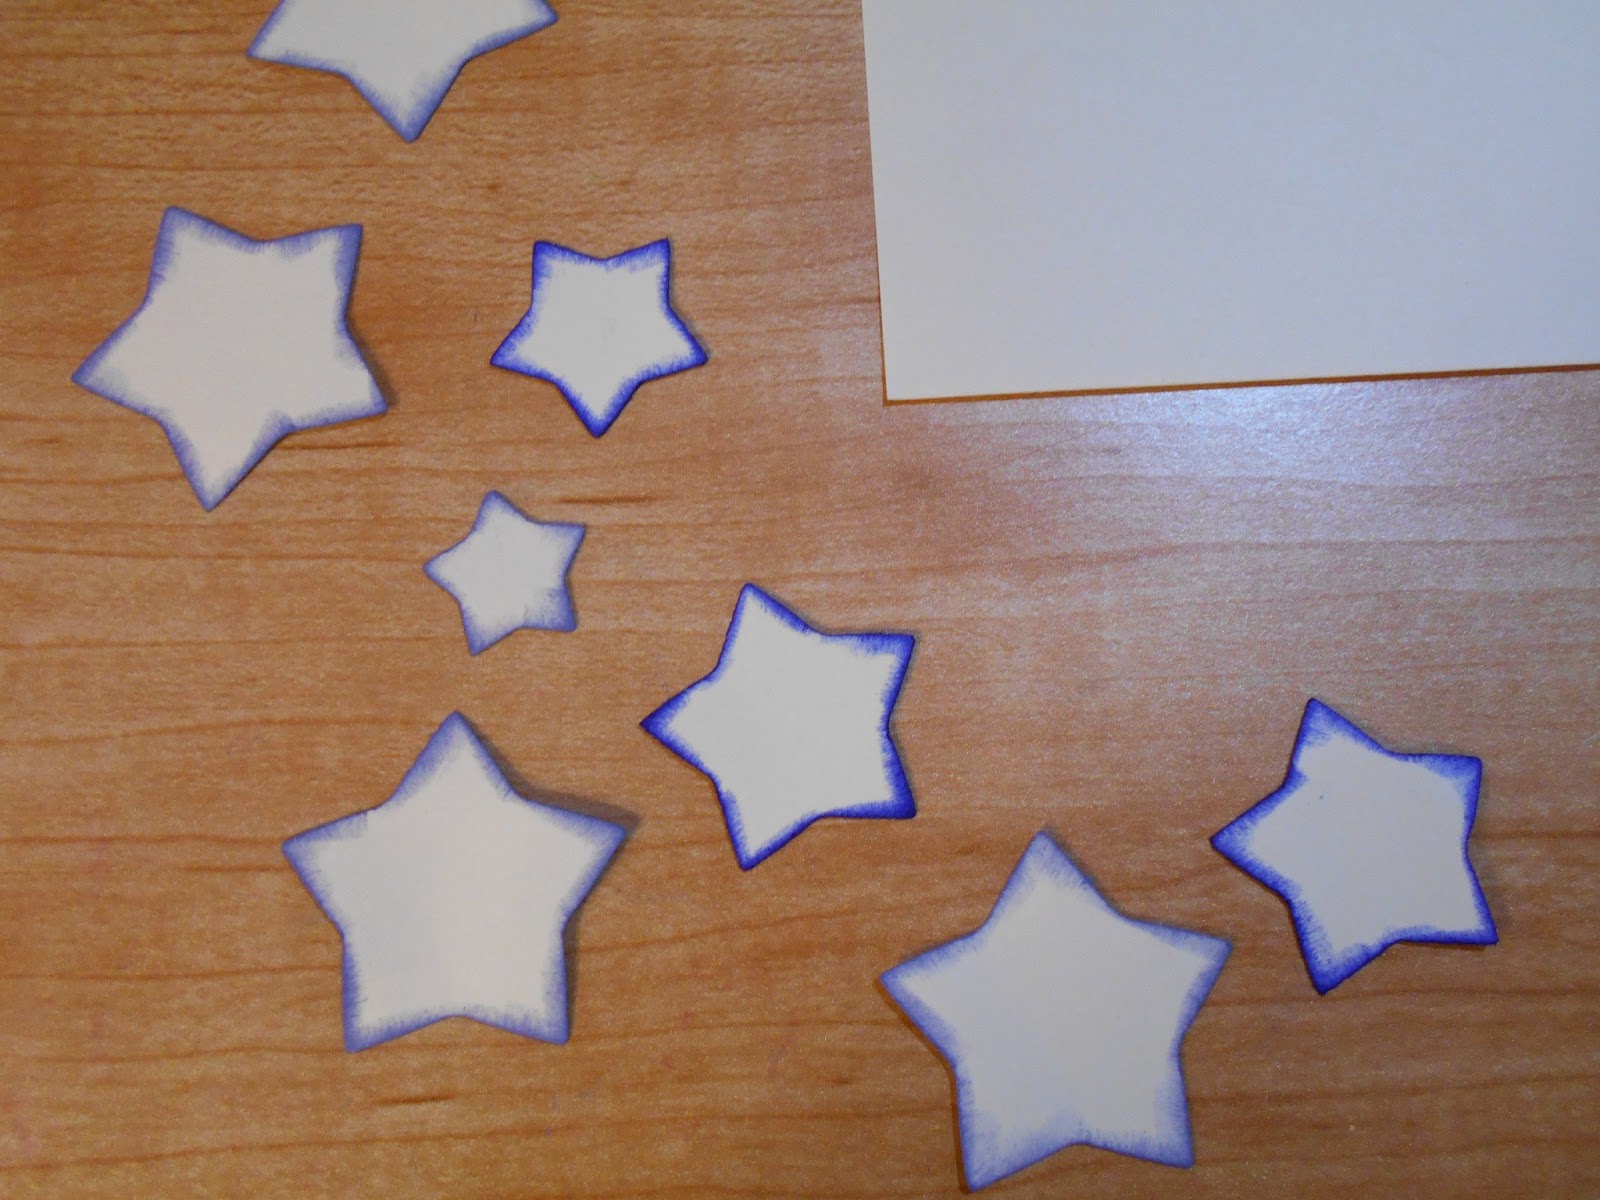
Then I took my stars and I inked the edges to add just a little bit of color and so you could see them better on the paper.

I put my stars back on the paper the way I wanted them to be. I even let some of them go over the edge, which I then cut off. I tend to be a very symmetrical person and have a hard time letting things be scattered. I wish I could have left the stars to be scattered, but I once again made it symmetrical. 

Once all the stars were in place I chose a Cuttlebug folder that I wanted and ran it through my Cuttlebug. Giving it the embossed look makes it look like the stars and the background are all one piece of paper.

I had the perfect stamp to go along with the stars. It's a Christmas stamp, but I really liked the saying.

Simple inside of the card.

I hope you enjoyed seeing a new technique. It is a fun one to do and I hope to use it again. It's quite simple as well and fairly quick to put together.

Monday, June 17, 2013

You're Invited

Tonight's card is very simple as I am very tired. I bought the card on the Silhouette online store and cut it with my Silhouette.


This is called an easel card. I made it monochromatic in shades of green. I didn't put what type of party so that down the road it could be used for any type of party. All I would have to do is cut out some lettering and put it on the front of the card. 

Here is the card when it lays flat.

For the inside I stamped it with the specifics for a party.

Not everyday has to be complex. It is okay to be simple sometimes. 

Sunday, June 16, 2013

Be Yourself

One thing I am trying to learn through all of this is to just be myself. I am in on this project with one of my best friends and at times I get jealous of how her cards turn out. I have to force myself to remember that everybody has different talents and strengths in different areas. Just because her cards aren't exactly like mine doesn't mean that hers are better than mine. We both have different views of things, as well as different styles.By doing this project together, even though we are 4 hours apart, it has strengthened our friendship. 

I did a layered card and instead of just doing solid on solid I decided to ink the edges of the lighter color to add more color to the card. 

Here is what the card looks like once it is all layered. 

As I was going through my papers I saw this saying and the color matched my card colors well, so I decided to go with it.

For the inside of the card I just used the same solid color with the inked edges.


Saturday, June 15, 2013

Get Well Beary Soon

We found out tonight about someone in our church that is special to us that is recovering from a major surgery. That is what inspired me to make tonight's card. I couldn't resist this bear when I saw it. Everything is cut out with my Silhouette Cameo.


The greatest medicine is friendship and love!


Friday, June 14, 2013

With Sympathy

The theme for today's card was going to be a get well soon card, but I decided to turn it into a sympathy card instead. I don't have much to say tonight, so this will be a short entry, but one thing I want to say is that I hope those who have been following are enjoying what they see. I won't always have a new technique for each day, but I will have a new card every day. That is my goal and no matter how I feel or what is going on I will make sure that I push through and get a card made.

I used the triple layer stamping technique again for this card. 

I always try to keep the inside simple so it doesn't take away from the message. I just added some little flowers with a punch that I have.

Thursday, June 13, 2013

Rainbow Thanks

I had what seemed to be a neat idea in my head that I wanted to put into a card. As I started working on my card it was starting to come along alright, but it wasn't looking like I had pictured in my head. It's amazing how we can picture things in our head, but when we go to put them down on paper they come out to be different. 

I drew out the flags for the word thanks and cut them out by hand. I knew I wanted to put stripes of some kind down the card that overlapped the flags by just a little bit. I chose to use glitter paper as the stripes because while looking through my stash I didn't like how any of the other papers were matching up.

The inside of the card I kept quite simple again. I used a border stamp, so that a little note could be written on the inside.

It didn't turn out exactly how I thought the card would, but I have to remind myself that it's okay for things to turn out different. It's okay to go through life and perceive things a certain, but then to accept the changes that come too.


Wednesday, June 12, 2013

Birthday Penguins

Another one of our nephews has a birthday coming up this summer, so I decided to make his card. His favorite animal is the penguin and that is how I decided to make this card.
I found the penguins and the birthday saying on the Silhouette online store and instantly thought it was perfect for our nephew. I cut them out with the Silhouette Cameo. I created the puddle with the Silhouette also. I used scrap pieces of paper for the party hats.

I just did the inside of the card super simple.